
Contents
- 1 Properties
- 2 Tile setting items
- 2.1 Name
- 2.2 Type
- 2.3 Position
- 2.4 Size
- 2.5 Width (Only when Type is Normal)
- 2.6 Height (Only when Type is Normal)
- 2.7 Uv Shift Inside
- 2.8 Animation
- 2.9 Animation Frame Rate
- 2.10 Color
- 2.11 Combination Group Name (When Type is not Normal)
- 2.12 Combination Side Flags (When Type is not Normal)
- 2.13 Tile Collider
- 2.14 Add Component
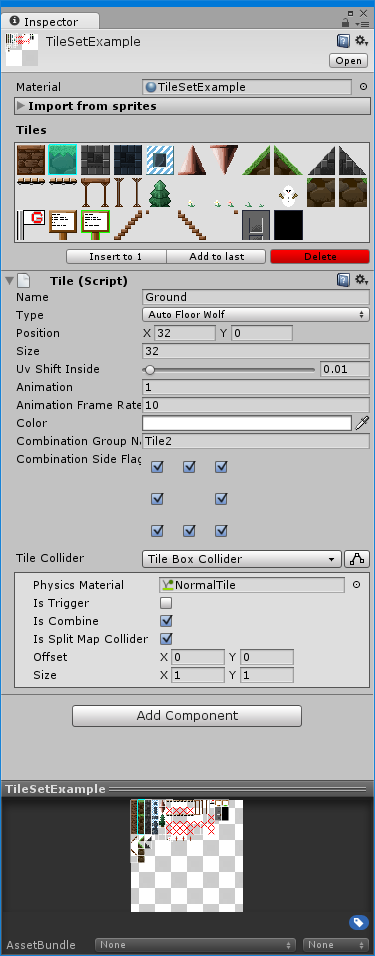
Properties
Material
Specify the material.
Currently available shaders are as follows.
- Nostalgia/Tiles/Default
A shader that has no effect of light. - Nostalgia/Tiles/Diffuse
Diffuse light shaders - Nostalgia/Tiles/Standard
A tile shader similar to Unity built-in Standard shader - Nostalgia/Tiles/Standard Specular
A tile shader similar to the Unity built-in Standard Specular shader - Nostalgia/Tiles/Canvas
Shader for Canvas (UI).
Be sure to use this shader when using Map for UI.
Attention: When using this shader, Animation Frame Rate of Tile setting is ignored and fixed at 10 fps.
About texture
If you use multiple tiles, you need to combine the textures into one.
Size
If the size of the texture is not a powered size of 2, the image will grow,
Make it a power of 2 size, or set Non Power of 2 of Texture Import Settings appropriately.
When using tile animations, only powers of 2 sizes are supported.
Filter Mode
Set the Filter Mode to Point so that adjacent pixel colors do not mix because tiles are adjacent to each other.
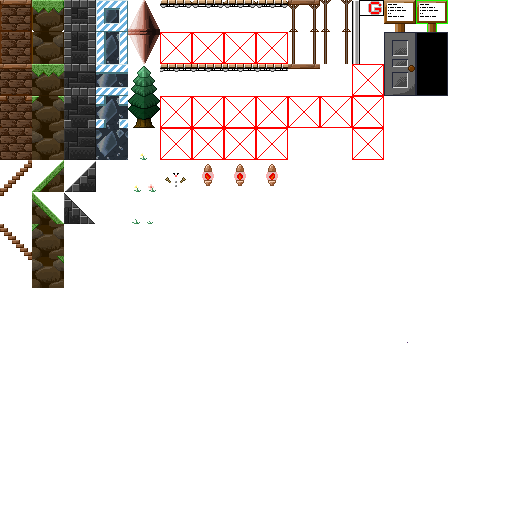
A case of textile for tile set
About auto tile format
The following types of auto tiles can be used.
-
RPG Maker VX floor tile
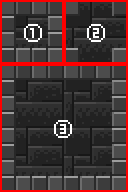
- Used to display the tile list.
- It has a boundary at the four corners.
- It consists of a pattern with boundaries on each side in 8 directions and a central pattern with no boundaries anywhere.
-
WOLF RPG editor compatible auto tile
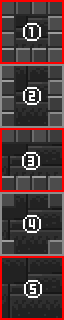
- It has a boundary on each side in 8 directions.
- It is a pattern with a boundary on the left and right.
- It is a pattern with a boundary above and below.
- It has a boundary at the four corners.
- It is a pattern that has no boundary anywhere.
Import from sprites
![]()
Import from the sprite set to the specified texture.
(Since the item is an opening and closing ceremony, please click on the name part of Import from sprites and open it)
After setting the sprite in the texture, check the sprite you want to import and press the Import button.
In addition, since it is only position information that is inherited when imported, please be sure to set the upper left coordinates of tiles correctly on the Sprite Editor.
Please refer to the setting items of the following tile after importing and set necessary items such as Type and Animation.
- Import Size
Specify the tile size (stored in Size of Tile) of imported sprite. - Check Allボタン
Select all sprites. - Uncheck Allボタン
Unselect all sprites. - Importボタン
Imports the selected sprite.
Tiles
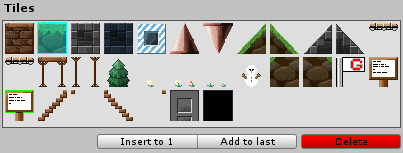
A list of already registered tiles is displayed.
By selecting it, tile information is displayed in the lower row.
- Insert to X button (X is a number)
Insert into the location of the currently selected tile. - Add to Last button
Add to the end. - Delete button
Delete selected tile.
Tile setting items
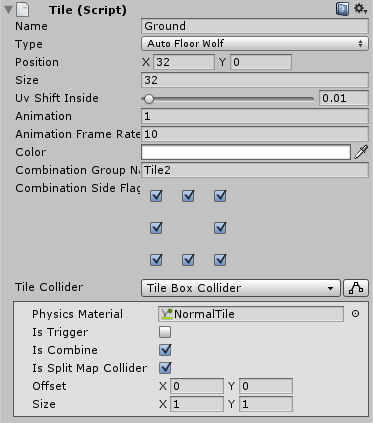
Name
Name of the tile
Type
Type of tile
- Normal
Normal tile not to be automated. - Auto Floor VX
RPG Maker VX floor tile compatible auto tile. - Auto Floor Wolf
WOLF RPG editor compatible auto tile.
Position
Top left coordinates on the texture (pixels)
Size
The width of one tile (pixels)
Width (Only when Type is Normal)
Horizontal width of the tile.
You can set tiles larger than 1 square.
Height (Only when Type is Normal)
Vertical width of the tile.
You can set tiles larger than 1 square.
Uv Shift Inside
Texel value of how far the UV is shifted inside the tile.
Please adjust it when an unintended line comes out by drawing texel outside the tile on the texture.
Animation
Number of frames to frame animation.
Animation must be arranged to the right from the coordinates specified by Position on the texture.
Animation Frame Rate
Frame rate of frame animation.
If minus is specified, reverse playback is set.
(When using the Tiles/Canvas shader, this item is ignored and fixed at 10 fps)
Color
Tile color.
Combination Group Name (When Type is not Normal)
Concatenated group name of the tile.
In the case of the same name, the connection by the auto tile will be effective even for different tiles.
If you do not specify anything, only the same tile will have the auto tile effect.
Combination Side Flags (When Type is not Normal)
Setting whether to connect auto tiles on each side of the tile.
For example, if you want to connect only horizontally, please set.
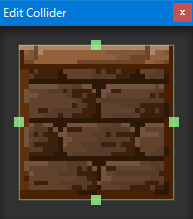
Tile Collider
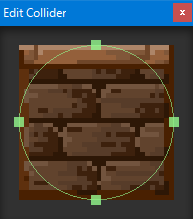
Set the type of Collider.
Pressing the ![]() EditCollider button opens the Edit Collider window so that you can set the shape with the mouse.
EditCollider button opens the Edit Collider window so that you can set the shape with the mouse.
None
![]()
Collider none
Tile Box Collider
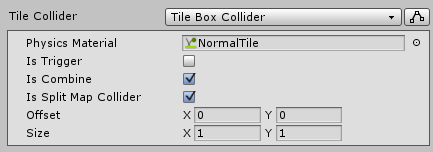
Set BoxCollider2D.
- Physics Material
Material of Collider.
Please set PhysicsMaterial2D as necessary. - Is Trigger
Set Collider’s Is Trigger. - Is Combine
By enabling this we will combine the Collider of the same tile adjacent to PolygonCollider 2D when tiling.
When combining, please be careful about which cell from Collider 2 D obtained by OnCollisionEnter 2 D etc. can not be identified. - Is Split Map Collider(Only when Is Combine is enabled)
By enabling this we split PolygonCollider 2D.
By splitting, the combined load at the time of placement is reduced and it is possible to increase speed.
However, breaks of polygons will occur in the middle of the split result map, so if there is a problem such as collision collision, please disable it. - Offset
Offset with 0 as the center of the tile. - Size
Size with 1 width of tile. - Edit Collider
Tile Circle Collider
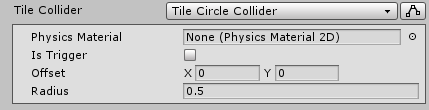
Set CircleCollider2D.
- Physics Material
Material of Collider.
Please set PhysicsMaterial2D as necessary. - Is Trigger
Set Collider’s Is Trigger. - Offset
Offset with 0 as the center of the tile. - Radius
Radius with tile width 1. - Edit Collider
Tile Edge Collider

Set EdgeCollider2D.
Please edit the shape in the Edit Collider window.
- Physics Material
Material of Collider.
Please set PhysicsMaterial2D as necessary. - Is Trigger
Set Collider’s Is Trigger. - Offset
Offset with 0 as the center of the tile. - Loop
Join the start and end points. - Points
Array of vertices. - Edit Collider

Dragging an anchor on an edge adds a vertex.
Hold Ctrl and click the anchor to delete the vertex.
Tile Polygon Collider
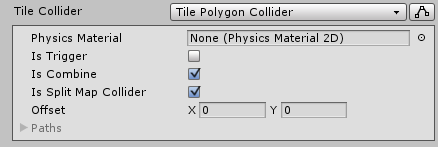
Set PolygonCollider2D.
Please edit the shape in the Edit Collider window.
- Physics Material
Material of Collider.
Please set PhysicsMaterial2D as necessary. - Is Trigger
Set Collider’s Is Trigger. - Is Combine
By enabling this we will combine the Collider of the same tile adjacent to PolygonCollider 2D when tiling.
When combining, please be careful about which cell from Collider 2 D obtained by OnCollisionEnter 2 D etc. can not be identified. - Is Split Map Collider(Only when Is Combine is enabled)
By enabling this we split PolygonCollider 2D.
By splitting, the combined load at the time of placement is reduced and it is possible to increase speed.
However, breaks of polygons will occur in the middle of the split result map, so if there is a problem such as collision collision, please disable it. - Offset
Offset with 0 as the center of the tile. - Paths
Array of vertices. - Edit Collider
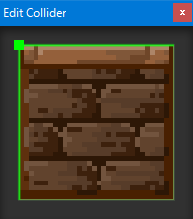
Dragging an anchor on an edge adds a vertex.
Hold Ctrl and click the anchor to delete the vertex.
Add Component
You can attach a script that inherits TileComponent to a tile.
By attaching, parameters can be set on Inspector as with normal Component.